Uploading data in bulk
This tutorial will follow a Flattened Data Layout. With a project that has this example layout:
.
├── biospecimen_experiment_1
│   ├── fileA.txt
│   └── fileB.txt
├── biospecimen_experiment_2
│   ├── fileC.txt
│   └── fileD.txt
├── single_cell_RNAseq_batch_1
│   ├── SRR12345678_R1.fastq.gz
│   └── SRR12345678_R2.fastq.gz
└── single_cell_RNAseq_batch_2
    ├── SRR12345678_R1.fastq.gz
    └── SRR12345678_R2.fastq.gz
Tutorial Purpose
In this tutorial you will:
- Set up constants for your project
- Create a manifest CSV file to upload data in bulk
- Upload all of the files for our project
- Add an annotation to all of our files
- Add a provenance/activity record to one of our files
Preferred API
The recommended way to upload files in bulk is
Project.sync_to_synapse
(or Folder.sync_to_synapse).
The legacy synapseutils.syncToSynapse is deprecated and will be removed in v5.0.0.
Uploading Very Large Files
The bulk upload approach using Project.sync_to_synapse() is optimized for uploading many files efficiently. However, if you are uploading very large files (>100 GiB each), consider using sequential uploads with async API instead.
For very large file uploads, see the execute_walk_file_sequential() function in uploadBenchmark.py as a reference implementation. This approach uses asyncio.run(file.store_async()) with the newer async API, which has been optimized for handling very large files efficiently. In benchmarks, this pattern successfully uploaded 45 files of 100 GB each (4.5 TB total) in approximately 20.6 hours.
Prerequisites
- Make sure that you have completed the following tutorials:
- This tutorial is setup to upload the data from
~/my_ad_project, make sure that this or another desired directory exists. - Pandas is used in this tutorial. Refer to our installation guide to install it. Feel free to skip this portion of the tutorial if you do not wish to use Pandas. You may also use external tools to open and manipulate CSV files.
1. Set up constants
First let's set up some constants we'll use in this script
import pandas as pd

import synapseclient
from synapseclient.models import Project

syn = synapseclient.Synapse()
syn.login()

# Step 1: Create some constants to store the paths to the data
DIRECTORY_FOR_MY_PROJECT = "test_folder"  # This should exist with your files in it
PATH_TO_MANIFEST_FILE = "test_manifest.csv"  # This doesn't need to exist yet
SYNAPSE_PROJECT_ID = ""  # Put your Synapse project ID here. This is the project where you want to upload your data.
2. Create a manifest CSV file to upload data in bulk
We use synapseutils.generate_sync_manifest to walk our local directory and produce a
manifest that maps each file to the correct parent folder in Synapse (creating folders
as needed). The output is a TSV with a parent column, so we convert it to CSV and
rename parent to parentId for use with sync_to_synapse.
# Step 2: Create a manifest CSV file with the paths to the files and their parent folders
# Note: When this command is run it will re-create your directory structure within
# Synapse. Be aware of this before running this command.
# If folders with the exact names already exists in Synapse, those folders will be used.


# old function generates a TSV
from synapseutils import generate_sync_manifest

generate_sync_manifest(
    syn=syn,
    directory_path=DIRECTORY_FOR_MY_PROJECT,
    parent_id=SYNAPSE_PROJECT_ID,
    manifest_path=PATH_TO_MANIFEST_FILE,
)
# reformat the manifest file to work with sync_to_synapse
manifest_df = pd.read_csv(PATH_TO_MANIFEST_FILE, sep="\t")
manifest_df.rename(columns={"parent": "parentId"}, inplace=True)
manifest_df.to_csv(PATH_TO_MANIFEST_FILE, index=False)
After this has been run if you inspect the CSV file created you'll see it will look similar to this:
path,parentId
/home/user_name/my_ad_project/single_cell_RNAseq_batch_2/SRR12345678_R2.fastq.gz,syn60109537
/home/user_name/my_ad_project/single_cell_RNAseq_batch_2/SRR12345678_R1.fastq.gz,syn60109537
/home/user_name/my_ad_project/biospecimen_experiment_2/fileD.txt,syn60109543
/home/user_name/my_ad_project/biospecimen_experiment_2/fileC.txt,syn60109543
/home/user_name/my_ad_project/single_cell_RNAseq_batch_1/SRR12345678_R2.fastq.gz,syn60109534
/home/user_name/my_ad_project/single_cell_RNAseq_batch_1/SRR12345678_R1.fastq.gz,syn60109534
/home/user_name/my_ad_project/biospecimen_experiment_1/fileA.txt,syn60109540
/home/user_name/my_ad_project/biospecimen_experiment_1/fileB.txt,syn60109540
3. Upload the data in bulk
# Step 3: After generating the manifest file, we can upload the data in bulk
project = Project(id=SYNAPSE_PROJECT_ID)
project.sync_to_synapse(manifest_path=PATH_TO_MANIFEST_FILE, send_messages=False)
While this is running you'll see output in your console similar to:
Validating manifest: /home/user_name/manifest-for-upload.csv
Validating that all paths exist...
Validating that all files are unique...
Validating that all the files are not empty...
Validating file names...
Validating provenance and parent containers...
About to upload 8 files with a total size of 8 bytes.
Uploading 8 files: 100%|███████████████████| 8.00/8.00 [00:01<00:00, 6.09B/s]
4. Add an annotation to our manifest file
At this point in the tutorial we will use pandas to manipulate the CSV manifest. If you are not comfortable with pandas you may use any tool that can open and manipulate CSV files such as Excel or Google Sheets.
# Step 4: Let's add an annotation to our manifest file
# Pandas is a powerful data manipulation library in Python, although it is not required
# for this tutorial, it is used here to demonstrate how you can manipulate the manifest
# file before uploading it to Synapse.

# Read CSV file into a pandas DataFrame
df = pd.read_csv(PATH_TO_MANIFEST_FILE)

# Add a new column to the DataFrame
df["species"] = "Homo sapiens"

# Write the DataFrame back to the manifest file
df.to_csv(PATH_TO_MANIFEST_FILE, index=False)

project.sync_to_synapse(manifest_path=PATH_TO_MANIFEST_FILE, send_messages=False)
Now that you have uploaded and annotated your files you'll be able to inspect your data on the Files tab of your project in the synapse web UI. Each file will have a single annotation that you added in the previous step. In more advanced workflows you'll likely need to build a more complex manifest file, but this should give you a good starting point.
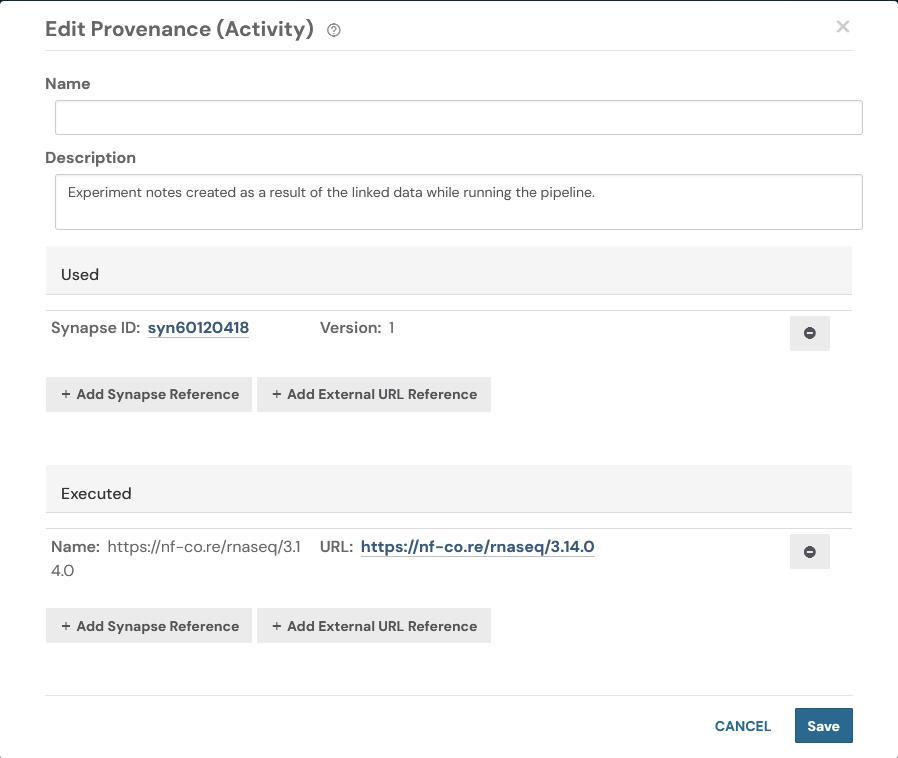
5. Create an Activity/Provenance
Let's create an Activity/Provenance record for one of our files. In otherwords, we will record the steps taken to generate the file.
In this code we are finding a row in our CSV file and pointing to the file path of another file within our manifest. By doing this we are creating a relationship between the two files. This is a simple example of how you can create a provenance record in Synapse. Additionally we'll link off to a sample URL that describes a process that we may have executed to generate the file.
# Step 5: Let's create an Activity/Provenance
# First let's find the row in the CSV we want to update. This code finds the row number
# that we would like to update.
row_index = df[
    df["path"] == f"{DIRECTORY_FOR_MY_PROJECT}/biospecimen_experiment_1/fileA.txt"
].index


# After finding the row we want to update let's go ahead and add a relationship to
# another file in our manifest. This allows us to say "We used 'this' file in some way".
df.loc[row_index, "used"] = (
    f"{DIRECTORY_FOR_MY_PROJECT}/single_cell_RNAseq_batch_1/SRR12345678_R1.fastq.gz"
)

# Let's also link to the pipeline that we ran in order to produce these results. In a
# real scenario you may want to link to a specific run of the tool where the results
# were produced.
df.loc[row_index, "executed"] = "https://nf-co.re/rnaseq/3.14.0"

# Let's also add a description for this Activity/Provenance
df.loc[row_index, "activityDescription"] = (
    "Experiment results created as a result of the linked data while running the pipeline."
)

# Write the DataFrame back to the manifest file
df.to_csv(PATH_TO_MANIFEST_FILE, index=False)

project.sync_to_synapse(manifest_path=PATH_TO_MANIFEST_FILE, send_messages=False)
After running this code we may again inspect the synapse web UI. In this screenshot i've navigated to the Files tab and selected the file that we added a Provenance record to.

Source code for this tutorial
Click to show me
"""
Here is where you'll find the code for the uploading data in bulk tutorial.
"""

import pandas as pd

import synapseclient
from synapseclient.models import Project

syn = synapseclient.Synapse()
syn.login()

# Step 1: Create some constants to store the paths to the data
DIRECTORY_FOR_MY_PROJECT = "test_folder"  # This should exist with your files in it
PATH_TO_MANIFEST_FILE = "test_manifest.csv"  # This doesn't need to exist yet
SYNAPSE_PROJECT_ID = ""  # Put your Synapse project ID here. This is the project where you want to upload your data.

# TODO switch to using new version of synapseutils/sync.py.generate_sync_manifest
# https://sagebionetworks.jira.com/browse/SYNPY-1809

# Step 2: Create a manifest CSV file with the paths to the files and their parent folders
# Note: When this command is run it will re-create your directory structure within
# Synapse. Be aware of this before running this command.
# If folders with the exact names already exists in Synapse, those folders will be used.


# old function generates a TSV
from synapseutils import generate_sync_manifest

generate_sync_manifest(
    syn=syn,
    directory_path=DIRECTORY_FOR_MY_PROJECT,
    parent_id=SYNAPSE_PROJECT_ID,
    manifest_path=PATH_TO_MANIFEST_FILE,
)
# reformat the manifest file to work with sync_to_synapse
manifest_df = pd.read_csv(PATH_TO_MANIFEST_FILE, sep="\t")
manifest_df.rename(columns={"parent": "parentId"}, inplace=True)
manifest_df.to_csv(PATH_TO_MANIFEST_FILE, index=False)

# Step 3: After generating the manifest file, we can upload the data in bulk
project = Project(id=SYNAPSE_PROJECT_ID)
project.sync_to_synapse(manifest_path=PATH_TO_MANIFEST_FILE, send_messages=False)

# Step 4: Let's add an annotation to our manifest file
# Pandas is a powerful data manipulation library in Python, although it is not required
# for this tutorial, it is used here to demonstrate how you can manipulate the manifest
# file before uploading it to Synapse.

# Read CSV file into a pandas DataFrame
df = pd.read_csv(PATH_TO_MANIFEST_FILE)

# Add a new column to the DataFrame
df["species"] = "Homo sapiens"

# Write the DataFrame back to the manifest file
df.to_csv(PATH_TO_MANIFEST_FILE, index=False)

project.sync_to_synapse(manifest_path=PATH_TO_MANIFEST_FILE, send_messages=False)

# Step 5: Let's create an Activity/Provenance
# First let's find the row in the CSV we want to update. This code finds the row number
# that we would like to update.
row_index = df[
    df["path"] == f"{DIRECTORY_FOR_MY_PROJECT}/biospecimen_experiment_1/fileA.txt"
].index


# After finding the row we want to update let's go ahead and add a relationship to
# another file in our manifest. This allows us to say "We used 'this' file in some way".
df.loc[row_index, "used"] = (
    f"{DIRECTORY_FOR_MY_PROJECT}/single_cell_RNAseq_batch_1/SRR12345678_R1.fastq.gz"
)

# Let's also link to the pipeline that we ran in order to produce these results. In a
# real scenario you may want to link to a specific run of the tool where the results
# were produced.
df.loc[row_index, "executed"] = "https://nf-co.re/rnaseq/3.14.0"

# Let's also add a description for this Activity/Provenance
df.loc[row_index, "activityDescription"] = (
    "Experiment results created as a result of the linked data while running the pipeline."
)

# Write the DataFrame back to the manifest file
df.to_csv(PATH_TO_MANIFEST_FILE, index=False)

project.sync_to_synapse(manifest_path=PATH_TO_MANIFEST_FILE, send_messages=False)